Uncategorized

baby boy ties..{tutorial and free download}

Wow, I feel like I have been gone for 2 weeks!  Seattle was a dream. It is so gorgeous up there. It was so nice to let my kids play outside constantly (and they did!)  I will do a few posts coming up to show you a few of my favorite activities (raspberry jam making, a trip to the beach to stay in the cutest beach house, hiking, going to Les Miserables, the yummiest cupcakes, etc.) It was a good trip to say the least..and the company wasn’t too bad either!:)
Today, I thought I’d share a quick tutorial I have put on a few other blogs this summer. (I like to finally get all my posts in one place)..and I have a girl version tomorrow. (you are going to love the colors)  This is a perfect gift to take to see a baby for the first time..or to add to a baby shower gift.  Remember, you can fill a little sack with anything (socks, shoes, onesies, etc) and add the FREE downloadable tag at the end.  A perfect gift for ANY handsome little devil:
Today we will make the:
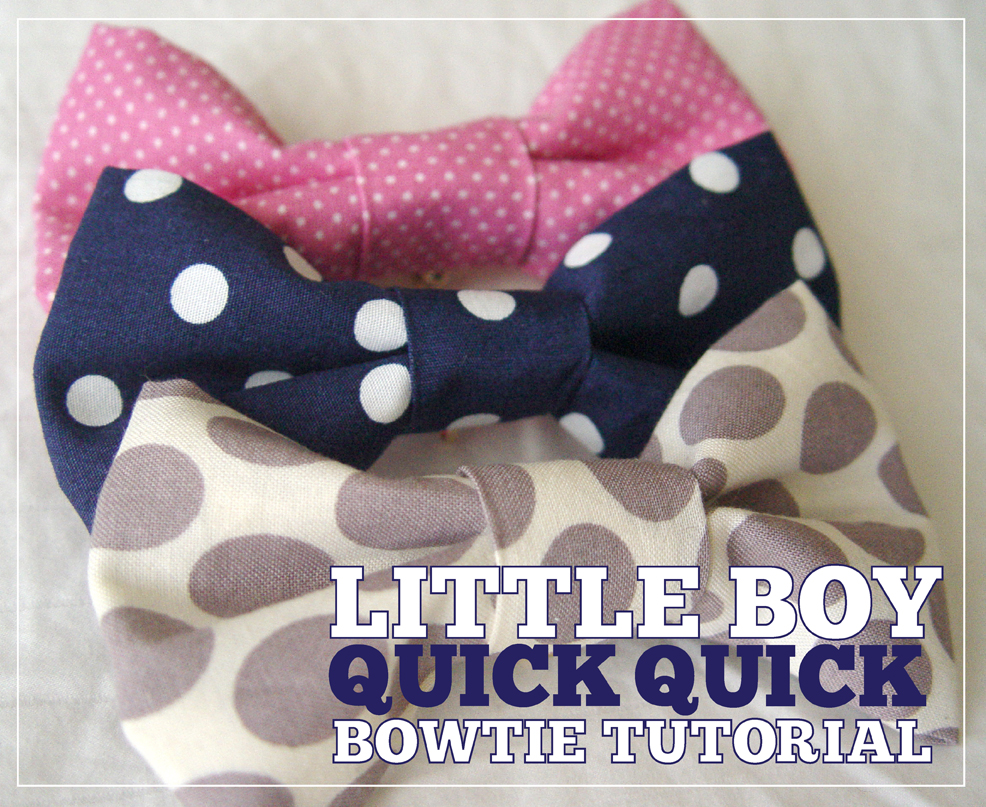
If I could put an emphasis on a word in that title it is definitely QUICK!  Here is a quick rundown.
To start out you will need:
11″x6″ piece of fabric
2″x4″ piece of fabric
sewing machine
hot glue gun
clip on earrings clip (found at craft stores)
little piece of felt
and here we go…
1- fold your big piece of fabric in half (the long way) and sew right sides together.  Sew one end shut and then pull the right side out. Fold unfinished side in and sew shut (just right on top of the fabric. Iron the piece flat.  Take the little piece of fabric with you and iron down the small sides 1/2″ and then fold the piece in thirds long way and iron. You will now have a small piece that is 1″x 2 1/2-3″ long.
2- take big piece of fabric and fold in one side and glue. 3. Fold other side in and glue. (you will notice that this side overlaps over the outside, I will show you how to fix this in the next step. 4. As you glue the second side down, make sure the sides do not overlap the outer edge…I just hot glue the end and then sort of scruch those sides down  (like in the picture) 5. Turn bowtie over and pinch the middle in and glue (do not let the glue show..you don’t need too much.  Now you will take your small piece and lay it over the front of the bowtie. Put a little glue on the backside in the middle and secure one the ends down. then a little bit of glue on the other end of the small piece and pull it around and secure. 6. Get out your clip on pieces.  7. The ones I bought had a little extra piece of metal on it, I simple cut it off and laid it flat.  8.  Glue back of clip on down on the back side of the tie. 9. place a little felt and glue it down as well (so it looks finished). 10. You are done!  The more you make, the faster they will go.
I also love to package the gift up..here is what I did with these:
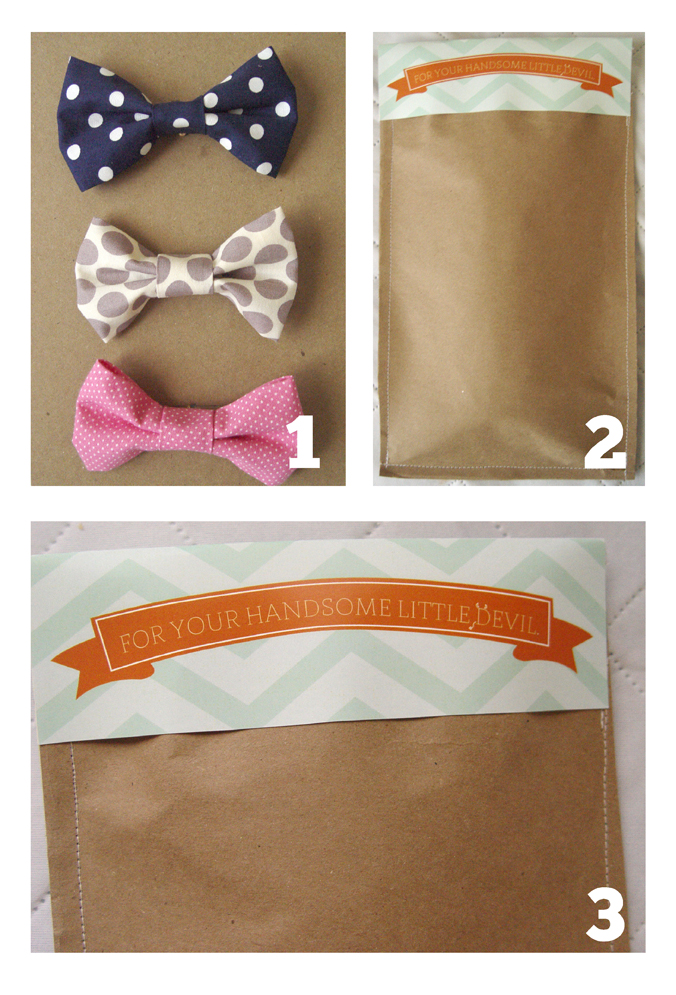
1. Took a piece of thin chipboard and cut slits in them and secured the ties on them by their own clips. 2.  Next, I took a piece of kraft paper and sewed it along the edges and over the top of the ties. I downloaded these sweet little bag toppers and added one on top.  3. Now it’s all ready to give to any “Handsome Little Devil” you come across.
To download the bag toppers, go HERE.

Remember, FREE downloads are for followers of Kiki Creates ONLY!(just takes a second over on the sidebar!)

Thanks for stopping by!
linking to:

20 thoughts on “baby boy ties..{tutorial and free download}

  1. Joy Burkhart says:

    So sweet and seems easy enough! Thanks for the tut and the bag topper!
    xoxoxo
    Joy

  2. Michelle says:

    Adorable! I do love quick.

  3. Anonymous says:

    Sounds simple enough – thanks for posting the pics as part of the steps for making the baby ties!
    -Jackie

  4. Spunky Junky says:

    Love it! So simple and cute, it's so refreshing to see cute boy accessories. Halsey

  5. Crystal says:

    On step 2 how far in do I fold the side? Thanks

    curlyboom at yahoo dot com

  6. http://findingsecrettreasures.blogspot.com says:

    so cute, looks easy enough, I'm going to try to make one for my grandson, I'll let you know how it turns out!

  7. Brittany @ My Decoupaged Life says:

    I absolutely love these. I don't have a boy nor will I but I definitely plan on making these for the little boys in my extended family. I hope you don't mind but I featured this on my Saturday Show Off
    http://www.mydecoupagedlife.com/2012/01/show-off-saturday-baby-projects.html

  8. Anonymous says:

    I finally made these today. I have been wanting to ever since I saw this post!
    It was easy once I made one. I do have to say that they are really for little boys (2-3 year olds) and looked a little big on my 7 month old. So I took it down to a 9 x 5 piece of fabric and 1 1/2 x 3 piece of fabric and it looked almost perfect for a newborn/baby. Could even do the small piece 1 x 3 depending on the fabric.
    I tried a flannel print and a normal poly blend. The flannel was stiffer and seemed to hold it's shape better, but I for sure needed the full 4 inches on the small piece to wrap it tight.

    Anyhow, just notes for future reference.

    Thanks so much!
    ~Rachel

  9. itsasquashyworld says:

    Thanks for sharing such lovely tutorial 🙂

  10. Anonymous says:

    I just made two of these little bow ties, and they turned out so dang cute! Thanks for your tutorial.

  11. paloma says:

    Hi! I found this tutorial on Pinterest! Love your bow ties! They are darling! I was wondering where you found the bow tie clips?

  12. Caitlin says:

    These turned out soooo well! Thank you so much for the tutorial! I think I’m going to make a bunch in bulk for future shower gifts!

  13. These are absolutely, positively the most adorable things I’ve ever seen!
    Liz

  14. Rachael says:

    I’m looking for someone to make me about 40 of these for party favours for my daughters first birthday… Any ideas where?

  15. Leilani says:

    I just made three of these in no time and used hem tape because I didn’t have a sewing machine and it worked out just as great! Thank you this was a simple, fun, and easy to do tutorial :). Can’t wait for my baby boy to wear them!

  16. Lori says:

    You’re kidding me!! I opened your page to read about fabric shopping with kids and saw this flip by in the header. I searched Pinterest for hours last night looking for a simple bow tie tute that didn’t involve Velcro or knowing the neck circumference. I will definitely be using this one!!! I’m making them for the boys in my son’s first grade class for Christmas!!

    1. Kiki Comin says:

      that’s awesome..i’d love to see pics of what you come up with! 🙂

Comments are closed.